
![]()
![]()
![]()
![]()
![]()
![]()
![]()
Please read this page carefully, and be sure that you have a window that will work before you buy. Purchase price is non-refundable.
These plans can be built using normal hand tools such as jigsaw, tape measure, calipers, etc. If you are comfortable with using these items, you will have no problem building and installing the satellite pane. The existing pane is replaced in the sash as you would do if it were broken.
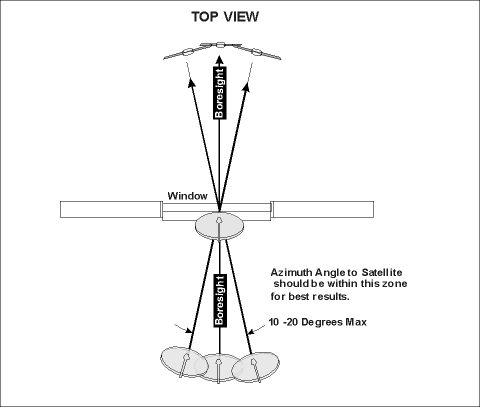
The design assumes that you have a window that is facing directly at the satellite, or "on boresight". If the satellite is 10-20 degrees off of boresight in azimuth, it won't be much of a problem. See the "TOP VIEW" Diagram below. If you start to get up into the 30-50 degree area, the window's apparent width becomes narrower, and the frame and walls will probably place much of the dish in "signal shadow" anyway, so we don't recommend using a window that faces away from the satellite this much.
The best thing do if in doubt, is to temporarily set up the dish where you want to put it, with the window open. Please read about the signal "footprint" in the section below before doing this. If you get acceptable signal, you can build the satellite pane and assume it will attenuate the signal little, if any.
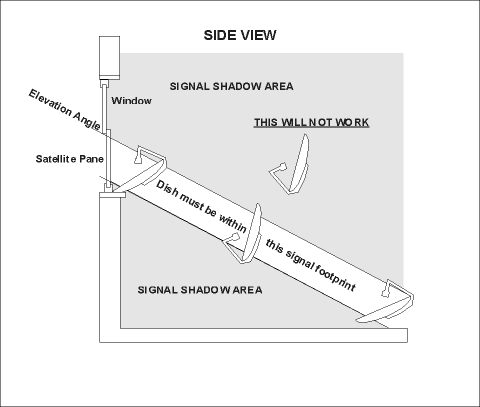
We recommend mounting the dish on the sill, inverted to save space, as in the photo on the Home page. You will probably get the best signal there. The photo is of an actual working installation. If you choose this orientation, you will have to fabricate a different mount. Remember though, wherever you mount it, you must project the azimuth and elevation look angles through the window and locate the dish within this "signal footprint". The further away from the window the dish is, the lower, and more to the side (if your azimuth angle is not "boresight) it has to be.
Click HERE to email us with any questions you may have.
|
|